Ice Vault - Documentation
Protocol documentation and system operations guide.
// QUICK START PROTOCOL
Initialize your secure storage architecture in less than two minutes. Ice Vault is designed to encrypt and archive your files directly from your browser engine.
01. UPLOAD AND ENCRYPT YOUR FIRST FILE
Navigate to the main upload interface. Drag and drop your target archive, or click to browse your local directory. Before the ingestion cycle begins, our protocol prompts you to set an optional encryption phase passphrase.
02. FILE PROTECTION
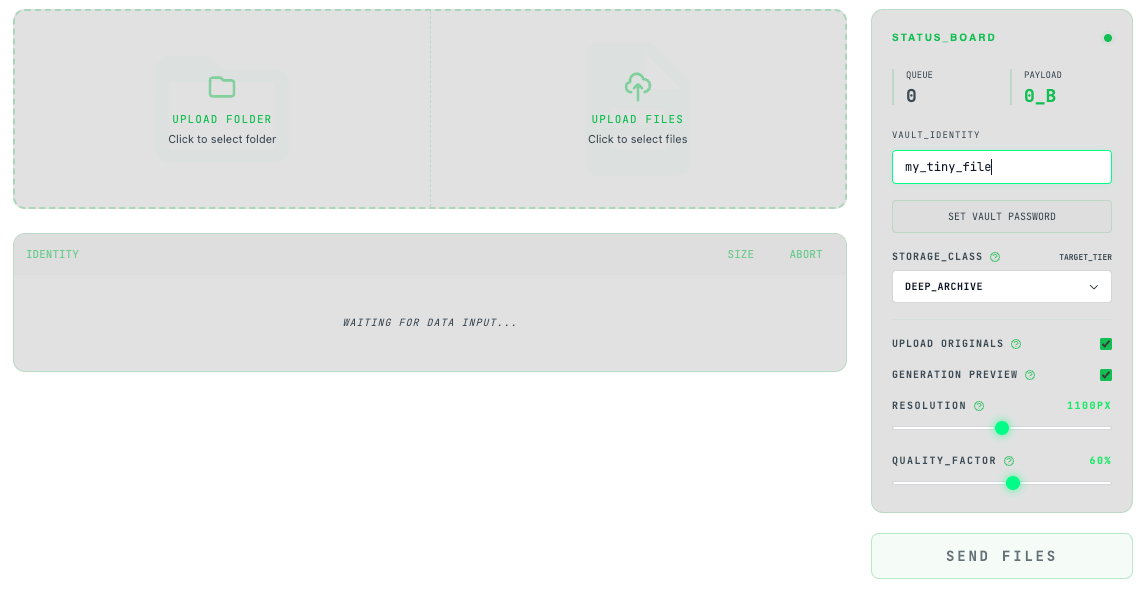
On the right side you can set your encryption password and change parameters for creation previews.
03. MONITOR THE LEDGER & STORAGE CLASSES
Once the stream finalizes, open your file repository. Your file will immediately register on the global ledger. Here you can verify its cryptographic footprint, deployment date, active size metrics, and designated storage layer tiers:
• STD (Standard) —
Hot tier storage node optimization for instantaneous download fetch routing.
• GLR / DEEP (Glacier) —
Cold-storage physical blocks designed for absolute security archiving with deferred extraction windows.
04. RETRIEVE AND DOWNLOAD ASSIDUOUSLY
To download an active file, expand the action cluster context menu on the far right of the asset file row. For standard assets, decryption token assembly starts instantly inside your sandbox layer.
// Next deployment steps
Ready to scale your node footprint? Advance your infrastructure setup by linking custom infrastructure endnodes:
// BYO S3 INTEGRATION GUIDE
Protocol orchestration blueprints for integrating, routing, and synchronizing external decentralized storage nodes (AWS S3, Cloudflare R2, MinIO) into your encrypted file ledger.
// 1. NODES INDEX & ALLOCATION MATRIX
Inside the infrastructure control panel, you are presented with the complete index list of your connected third-party bucket nodes. This matrix displays active global endpoints, bucket IDs, and strict status verifications.
// 2. ENCRYPTED UPLINK ROUTING (WRITABLE PROPAGATION)
The core routing system enforces a strict rule: only ONE external storage bucket can be flagged as active for write operations at any single unix microsecond timestamp. Whichever node is toggled with the
is writable
state descriptor absorbs 100% of incoming binary data packages during file ingestion sequences.
If an external node is actively declared as writable, the global system ingestion module automatically morphs. Developers and clients will see this custom bucket target dynamically populated as a destination node mapping on the file upload screen layer.
// 3. NODE UNLINKING & DE-PROVISIONING LIFECYCLE
When you execute a delete prompt against a third-party bucket entry within the index:
// 4. BACKWARD INDEX RE-SCAN (SYNC PROTOCOL)
To parse and restore visibility of data objects nested inside an existing bucket node, trigger the
Sync
action command located directly inside the context options dropdown menu of the specific bucket record.
Our engineering architecture cannot guarantee absolute compilation or perfectly accurate meta-extraction for arbitrary cleartext payloads existing natively inside raw third-party buckets. Incompatibilities in stream arrays might cause ingestion fragmentation.
Triggering the re-scan sequence when the file entries already map successfully into the system layout will NOT merge configurations. Instead, the scheduler will register duplicate entries inside the database matrix layer, mapping multiple asset nodes onto the same resource path.
// AWS S3 INTEGRATION GUIDE
Follow this guide to connect your own AWS S3 bucket as an external storage node.
// 01. IAM CREDENTIALS
To connect an external bucket, you need an AWS IAM User with programmatic access (Access Key ID and Secret Access Key).
AWS Guide: Creating IAM Users// 02. BUCKET PERMISSIONS
Your IAM user must have an inline policy attached allowing the service to read, write, and list objects in your specific bucket.
-
s3:ListBucket- Required to check bucket existence and map storage. -
s3:PutObject- Required to upload files to your vault. -
s3:GetObject- Required to retrieve and download your archived files.
// CORS CONFIGURATION
To allow your browser to securely upload files directly to your S3 bucket, you must configure Cross-Origin Resource Sharing (CORS).
1. Log in to your AWS Management Console and open the Amazon S3 service.
2. Click on the name of your specific storage bucket.
3. Switch to the Permissions tab at the top menu.
4. Scroll down to the very bottom of the page to find the Cross-origin resource sharing (CORS) section.
5. Click the Edit button and paste the configuration code provided below.
[
    {
        "AllowedHeaders": [
            "*"
        ],
        "AllowedMethods": [
            "GET",
            "PUT",
            "POST",
            "HEAD"
        ],
        "AllowedOrigins": [
            "https://icevault.space",
            "https://www.icevault.space"
        ],
        "ExposeHeaders": [
            "ETag",
            "x-amz-request-id",
            "x-amz-id-2",
            "Content-Disposition",
            "Content-Length",
            "Accept-Ranges"
        ],
        "MaxAgeSeconds": 3000
    }
]
// 03. AWS REGION
The AWS Region specifies the physical geographic location of the data centers where your bucket resides (e.g., us-east-1, eu-central-1).
Where to find it: Open your AWS S3 Console, look at the 'Bucket Region' column next to your bucket name, and copy the region identifier code.
AWS Guide: Available S3 Regions// 04. STORAGE PREFIX (OPTIONAL)
A prefix acts as a root folder inside your bucket (e.g., /external-files). If set, the service will isolate and upload all data strictly into this virtual directory, leaving the rest of the bucket untouched.
Leave this field empty if you want the service to use the absolute root of the bucket.
IMPORTANT NOTE: Ensure that your bucket has CORS (Cross-Origin Resource Sharing) configured properly if files are to be uploaded directly from the client browser interface.
// CLOUDFLARE R2 INTEGRATION GUIDE
Follow this guide to connect your own Cloudflare R2 bucket as an external zero-egress storage node.
// 01. BUCKET CREATION
Create a storage bucket inside your Cloudflare dashboard. R2 offers full S3 API compatibility with zero distribution data fees.
Cloudflare Guide: Creating R2 Buckets// 02. CORS CONFIGURATION
To allow secure, direct multi-part browser uploads to your R2 bucket via Pre-signed URLs, you must configure Cross-Origin Resource Sharing (CORS) in your bucket settings.
1. Log in to your Cloudflare Dashboard and navigate to R2.
2. Select your specific bucket and click on the Settings tab.
3. Scroll down to the CORS Policy block and click Add CORS policy.
4. Paste the configuration JSON layout provided below and click Save.
[
    {
        "AllowedHeaders": [
            "*"
        ],
        "AllowedMethods": [
            "GET",
            "PUT",
            "POST",
            "HEAD"
        ],
        "AllowedOrigins": [
            "https://icevault.space",
            "https://www.icevault.space"
        ],
        "ExposeHeaders": [
            "ETag",
            "Content-Type"
        ],
        "MaxAgeSeconds": 3600
    }
]// 03. R2 API TOKENS (S3 CREDENTIALS)
Ice Vault authenticates transactions using standard AWS Signature V4. You must generate an API Token with object read and write access scoped to your bucket.
-
Permissions:
Object Read & Write - Bucket Scope: Restrict to your specific vault bucket only.
Where to find credentials: Once generated, extract the Access Key ID, Secret Access Key, and the S3 endpoint URL containing your unique Cloudflare Account ID.
Cloudflare Guide: Authentication & Tokens// 04. ENDPOINT & REGION
Unlike traditional S3 providers, Cloudflare uses a unified account endpoint destination structure. The bucket region property is abstract and should be bound to 'auto'.
https://<your-account-id>.r2.cloudflarestorage.com
IMPORTANT ARCHITECTURAL NOTE: Ensure that the ExposeHeaders schema contains ETag. If absent, runtime client verification for fragmented encryption block components will fail during upload finalization cycles.
// SECURITY PROTOCOLS GUIDE
Manage your cryptographic identity, access vectors, and node authorization levels.
// 01. PASSWORD ROTATION
Updating your master password revokes temporary session tokens across other devices. Ensure your new passphrase meets high-entropy standards (minimum 12 characters, mixing alphanumeric and special characters).
// 02. ONE-TIME PASSWORD (OTP / 2FA)
An OTP (One-Time Password) is a dynamically generated 6-digit verification code based on the TOTP (Time-Based One-Time Password) cryptographic algorithm.
Even if a malicious actor intercepts your master password, they cannot gain entry to your node without your physical device. The encryption key changes automatically every 30 seconds, making brute-force vectors mathematically unfeasible.
Supported Applications:You can scan the provided QR code using industry-standard authenticators such as Google Authenticator, 1Password, Aegis, or Bitwarden.
// 03. NODE TERMINATION (ACCOUNT DELETION)
Requesting account deletion initiates a permanent wipe sequence of your identity metadata.
This action is destructive and irreversible. All indexed files and cryptographic references linked to this node will be purged from the active database. External decoupled nodes (like your custom BYO S3 storage) will remain untouched, but the credentials saved within this vault will be destroyed.
SECURITY NOTICE: Never share your raw Secret Key or seed phrase displayed during the OTP establishment phase. Digital Vault operators will never ask for these variables.
// DATA INGESTION & ARCHIVING
Learn how to secure, optimize, and upload your digital assets to the vault.
// 01. UPLOADING FILES & FOLDERS
⚡ Upload Files: Click the 'Upload Files' zone to select individual files or drag-and-drop them directly. Perfect for single archives, documents, or selected media.
📂 Upload Folder: Click the 'Upload Folder' zone to select an entire directory from your device. The system will automatically scan and preserve your full folder structure inside the vault.
// 02. STORAGE CLASSES & TIERS
Before initializing your upload, you must select how your data is stored. This directly impacts file availability and how previews are generated:
Your original files are immediately frozen for long-term safe keeping. To help you browse your frozen archive later, the system creates lightweight previews and stores them in a fast-access tier (Glacier IR), so you can always see what is inside without waiting.
If you choose these tiers, your files remain readily available for instant download. Because they are always active, the preview generation is automatically disabled — the system will upload your original files directly.
💡 External Storage Note: The STANDARD tier becomes available only if you have successfully connected your own external cloud bucket (BYO S3) via the settings panel.
// 03. SMART MEDIA PREVIEWS
When using Deep Archive, the system processes your files locally to generate a 'Live Preview' before sending them to the cloud. You can adjust the sliders on the right to control this process:
📸 Photos: The system creates a smaller, lightweight copy of your image. Moving the Resolution and Quality Factor sliders will dynamically change the file size. You will see a live preview of the resulting picture immediately on your screen.
🎬 Videos: The system extracts a short 10-second silent preview clip optimized at 360p resolution so you can quickly review the video content later.
📄 Other Files: For documents, archives, or code, no visual preview is generated. Only the file names and basic size data are saved to your index.
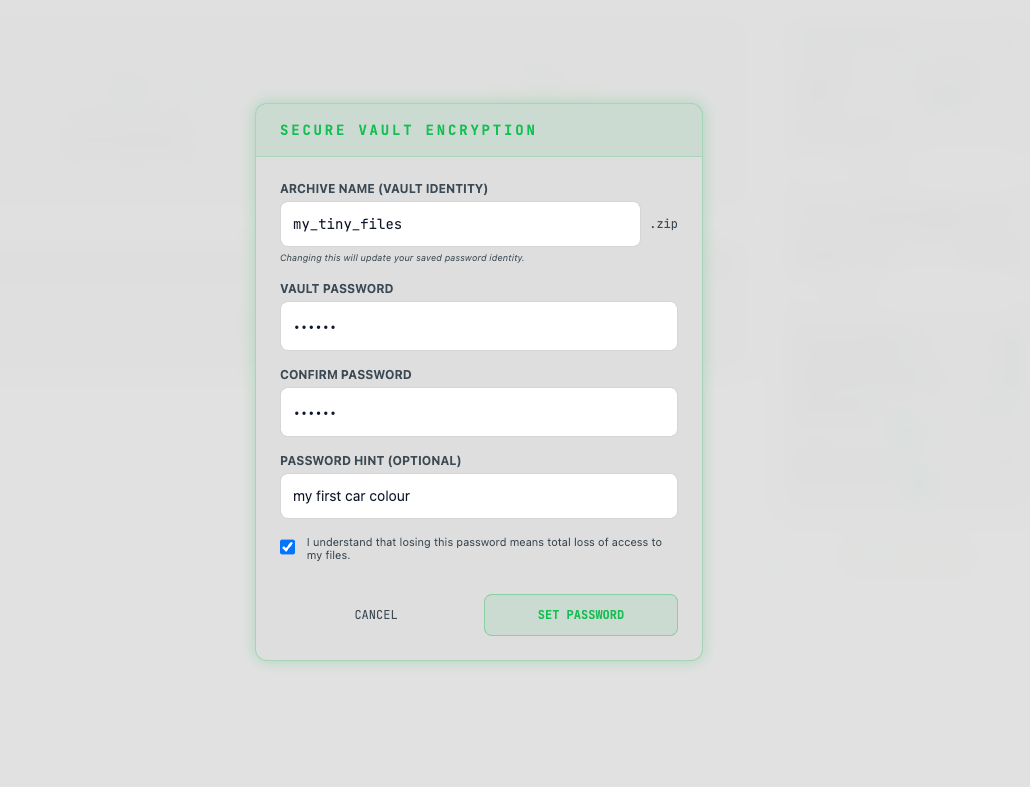
// 04. CLIENT-SIDE ENCRYPTION (CRITICAL)
Clicking 'Set Vault Password' opens the security shield protocol. This password is the foundation of your privacy.
This password is used to encrypt your files directly inside your browser BEFORE they leave your computer. The raw password is never sent to our servers, and we never store it.
Because of this zero-knowledge architecture, if you lose or forget this password, IT IS MATHEMATICALLY IMPOSSIBLE TO RECOVER YOUR FILES. There is no password reset button for your encrypted data. Please write it down safely or use a password manager.
READY STATE: Once your files are staged, your options adjusted, and your password/identity set, hit the INITIALIZE_UPLINK button to begin the secure transmission.
// Pricing & Billing // Architectural Choice
Protocol selection: Choose your data deployment strategy
Recommended for advanced users, system administrators, and developers who require complete physical custody of their data assets.
- > Deploy your own AWS Infrastructure.
- > Provision an isolated S3 Bucket partition.
- > Configure strict IAM access policies & lifecycle rules.
- > Link access keys directly to the settings in your account.
The standard out-of-the-box configuration. Ideal for creators and clients who value high-speed, zero-maintenance operational deployment.
- > Zero AWS configuration required. One-click uplink.
- > Fully automated distributed architecture (AWS Glacier/GCP).
- > Integrated automated metadata extraction & media previews.
- > Elastic storage tier allocation tailored to your quota metrics.
// System Note: Can't decide? You can initialize on the Managed Vault Allocation tier today and bridge your external S3 clusters later when the BYO custom protocol becomes necessary.
// DEVELOPER APPARATUS & SDK
Integrate IceVault cryptographic archiving directly into your application pipeline via our automated developer toolkit.
01. PYTHON CLIENT ENGINE
The official IceVault Python client architecture is hosted directly on GitHub. While the package undergoes final optimization before the PyPI release ledger, you can securely build and link the library stream directly from the master source branch:
Review open source core scripts, manifest states, or submit node integrations here: github.com/adminIceVault/icevault-python-client
02. RAW REST ENDPOINTS (NO-SDK ROUTING)
If you are deploying architectures outside the Python scope (e.g., Go, Node.js, Rust), or prefer executing native raw payload transactions without the overhead of client libraries, you can map your uplink flows through our core endpoints directly.
Interactive OpenAPI Specification Available
Access our runtime Swagger mapping cluster to test live endpoints, explore schema footprints, authorization scopes, and raw HTTP stream parameters:
// API KEY PROVISIONING PROTOCOL
Follow this structural runtime procedure to generate cryptographic access tokens for external service integration.
// 1. GENERATION LIFECYCLE SEQUENCE
// 2. SECRET RETRIEVAL PROTOCOL (CRITICAL)
Upon successful pipeline generation validation, the architecture compiles a completely unique access token primitive prefixed with structural string tags:
iv_live_...
⚠️ Security Matrix Lockdown Notice:
For strict zero-knowledge security standard patterns, this string signature context will NEVER be retrievable, viewable, or rendered in plain text format again once this modal display sequence terminates. The system stores only cryptographic hash mappings.
➔ Action: Copy and store this secret payload sequence to an encrypted local block immediately.
// DEVELOPER APPARATUS
Follow this protocol orchestration matrix to initialize server-side archive ingestion using the Python SDK client library.
from icevault import Client

client = Client(
    api_key="iv_live_46fdcdfa05e52748f03bf794949f2a56d84487aeb67faaff",
)

# Execution of synchronous payload encryption & uplink allocation
client.storages.upload_files(
    file_paths=["/absolute/path/file.png", "relative_dir/file2.png"],
    archive_name="production_assets_v2.zip",
    storage_class="DEEP_ARCHIVE",
    password="super_secure_passphrase",
    password_hint="Vault deployment sequence root key"
)
// METHOD PARAMETERS MAP: upload_files()
file_paths
list[str | Path]
archive_name
str | None
storage_class
StorageClassEnum | str
"STANDARD" -
Immediate hot fetch routing.
"GLACIER" -
Secure archiving architecture.
"DEEP_ARCHIVE" -
Absolute cold physical arrays sequence (Default).
password
str | None
password_hint
str | None
// DEVELOPER APPARATUS
Utilize this protocol routing matrix to fetch, filter, and paginate through your cryptographic ledger entries using the Python SDK client.
from icevault import Client

client = Client(
    api_key="iv_live_46fdcdfa05e52748f03bf794949f2a56d84487aeb67faaff"
)

offset = 0
limit = 50
has_more = True

while has_more:
    # Query runtime ledger stream using strict validation payload mappings
    result = client.archives.filter({
        "limit": limit,
        "offset": offset,
        "order_by": "created_at",
        "ascending": False,
        "status": ["UPLOADED", "RESTORED"]
    })

    for arch in result.items:
        print(f"[{arch.status}] Cryptographic Entity Matrix: {arch.name} ({arch.size_mb} MB)")

    offset += limit
    has_more = offset < result.count
// FILTER SCHEMA MAP: GetArchiveFilter
collection_id
str | None
"ALL_COLLECTIONS_ID"
(Global index lookup across entire array pipeline)
limit
int100
offset
int0
search
str | None
status
list[str] | str
"UPLOADED",
"ARCHIVED",
"RESTORED",
"DELETED",
"FAILED".
is_encrypted
bool | None
order_by
OrderByEnum | str
"created_at"
(Timeline sequence - Default)
"status"
(Runtime lifecycle state)
"preview_count"
(Contained payload metrics)
"file_name"
(Alphanumeric string index)
"archive_size"
(Physical structural weight)
ascending
bool
True = A-Z /
Ascending order;
False = Z-A /
Descending order.
// DEVELOPER APPARATUS
Follow this guide to execute encrypted asset stream retrieval and pull binaries down onto your local infrastructure stack.
import os
from icevault import Client

client = Client(
    api_key="iv_live_46fdcdfa05e52748f03bf794949f2a56d84487aeb67faaff"
)

# Optional: Locate specific mapping target via query filters
archives = client.archives.filter(
    archive_filter={
        "status": "UPLOADED",
        "search": "api_test.zip"
    },
)

filename = "downloaded_bundle.zip"

for item in archives.items:
    print(f"Triggering stream pipeline for node: {item.uuid}")

    # Executing the raw byte ingestion stream back to local disk structure
    client.archives.download(
        uuid=item.uuid,
        destination_path=filename
    )

    if os.path.isfile(filename):
        print(f"Success -> Weight: {os.path.getsize(filename)} Bytes")
// METHOD PARAMETERS MAP: download()
uuid
UUID | str
destination_path
str | None
// DEVELOPER APPARATUS
Follow this guide to purge archive metadata mapping structures or unbind assets from your active storage index via Python SDK.
from icevault import Client

client = Client(
    api_key="iv_live_46fdcdfa05e52748f03bf794949f2a56d84487aeb67faaff"
)

# Lookup target entities matching metadata criteria queries
archives = client.archives.filter(
    archive_filter={
        "status": "requested_restoring",
        "search": "api_test.zip"
    },
)

for item in archives.items:
    print(f"Executing asynchronous deletion routine for ledger path node: {item.uuid}")

    # Triggering the downstream deletion payload sequence mapping
    client.archives.delete(uuid=item.uuid)

    print(f"Purge verification signal transmitted successfully.")
// METHOD PARAMETERS MAP: delete()
uuid
UUID | str
// View files
Here you will find instructions how to view uploaded files to Ice Vault
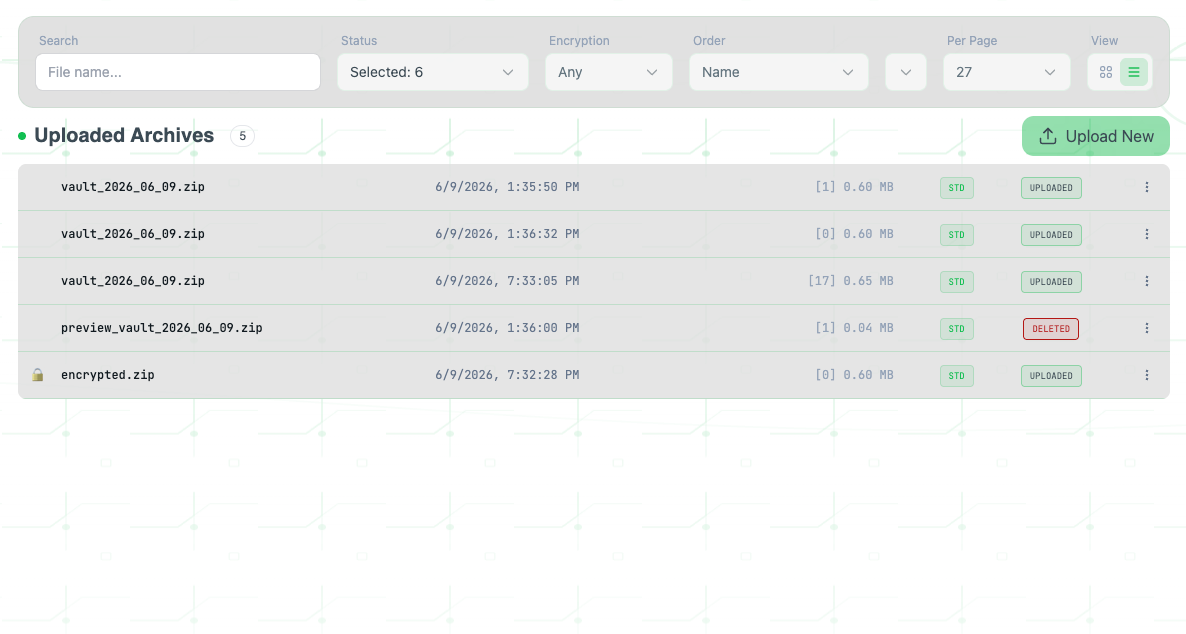
// FILE MANAGER (UPLOADED ARCHIVES)
The central control panel to monitor, filter, and manage your encrypted cold-storage assets.
// 01. SMART FILTERING TOOLBAR
Allows upstream query targeting by file metadata, encryption status, and storage layer types. Use the 'Status' dropdown to isolate active nodes from purged records.
// 02. STORAGE LAYER DEFINITION (STD / DEEP)
Displays the immutable storage class bound to the archive on initialization. STD represents standard hot storage, while DEEP flags Amazon S3 Glacier Deep Archive targets.
// 03. RETENTION STATUS FLAGS
Tracks the block lifecycle availability. UPLOADED triggers readiness for download requests, while DELETED states indicate the allocation has expired or been manually wiped from the ledger.
// ARCHIVES GALLERY PREVIEW ENGINE
蓝PRINT FOR INTERACTIVE METADATA INSPECTION AND DECRYPTED CONTENT STREAMING.
// 1. INITIALIZATION & ENTRY CRITERIA
To initialize the runtime media viewer overlay, click explicitly on the target archive filename string inside the primary storage index ledger. The core system will mount the preview mapping container instantly.
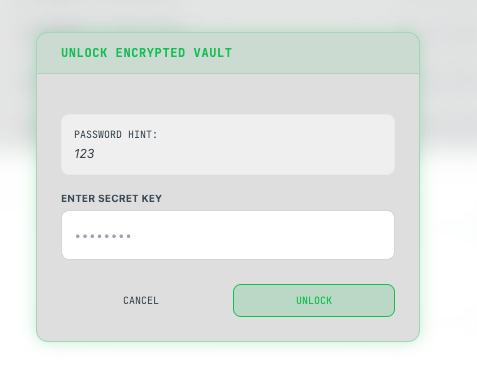
// 2. CRYPTOGRAPHIC ACCESS GATEWAY (PASSWORDS)
If the archive target is bound by a custom security hash payload, the system intercepts the execution route. Before the file system tree unrolls, a secure decrypt modal will intercept the viewport requesting the authorized token.
// 3. ASSET PARSING AND STUB RESOLUTION
Supported dynamic file formats (JPEG, PNG, WebP, MP4, MOV) are decoded instantly into interactive cleartext image grids or continuous video stream elements within the viewing grid canvas.
For binary packages, databases, and custom system blocks, the compiler mounts an abstract placeholder node stub. It explicitly displays the native filename tag string while keeping raw sub-buffers unrendered.
// 4. DIRECTORY TREE TRAVERSAL & FULLSCREEN VIEWPORT
Nested directory paths inside the target data cluster are navigated recursively. Clicking a folder block descends the active context tracking loop layer down into that specific subtree.
// COLLECTIONS ARCHITECTURE
Understand how to structure, nest, and manage your asset directories within the system ledger.
// ROOT LEVEL & PERSISTENT NODES
• All archives —
The base immutable collection. It acts as a global index, displaying every single file bound to your account, regardless of its underlying collection assignment.
• / (Root) —
The absolute cryptographic root of your custom directory tree. Immutability rules state that you cannot rename or delete the core Root context or the global All Archives node.

// DIRECTORY OPERATIONS & CONTEXT MENU
Hovering over any mutable collection level activates an inline context menu button. Triggering this menu grants access to granular structural operations:
1. Create Sub-collection — Spawns a nested child directory downstream from the current selected node path.
2. Rename — Updates the namespace string on the ledger for the target folder entity.
3. Delete — Purges the folder record from the directory tree configuration map.
// DRAG-AND-DROP INHERITANCE
The collection tree supports direct reactive drag-and-drop orchestration. You can seamlessly drag one folder node and drop it inside another to alter your nesting hierarchy.
// LIFECYCLE & PURGE BEHAVIOR
When a collection node is executed for deletion, the platform protects your assets from cascade purging. The collection folder database record is wiped, while all contained files are safely unlinked and transferred directly back into the absolute Root context — remaining loose without a specific collection assignment.